LocalLLM
Step 1: Install and Run Ollama
- Download and install Ollama for Mac
- Open terminal and pull a model that handles context and reasoning well (like llama3.2 or mistral)
ollama run llama3.2
Step 2: Spin Up Open WebUI via Docker
- use Docker to run Open WebUI
- Because Ollama is running natively on your host Mac, we need to tell the Docker container to look at your host machine's network interface
docker run -d -p 8080:8080 --add-host=host.docker.internal:host-gateway -v open-webui:/app/backend/data --name open-webui --restart always ghcr.io/open-webui/open-webui:main
Note: --add-host=host.docker.internal:host-gateway allows Open WebUI inside the container to talk to Ollama on your Mac via http://host.docker.internal:11434.
- Once the container pulls and starts, open your browser and go to: http://localhost:3000
- Create your admin account (this is completely local to your machine).
- Go to Settings > Connections and verify that the Ollama API URL is pointing to http://host.docker.internal:11434. Click save.
Step 3: Upload Your PDFs (RAG Setup)
- Open WebUI has a built-in vector database (ChromaDB) that handles documents automatically
- In the Open WebUI sidebar, Workspace > Knowledge > Add New Knowledge
- Click Upload Documents and drop your PDFs there.
- To chat with them: Start a new chat, select your model (e.g., llama3), and in the message box, type # followed by the name of your document (e.g., #financial_report.pdf).
- Ask your question. The system will parse the PDF chunks, inject them into the context window, and answer based on your file.
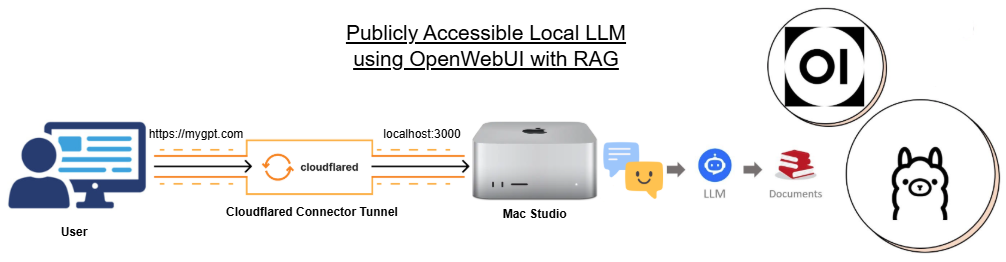
Step 4: Expose to Your Domain via Cloudflare Tunnel
- To access this securely outside your home network without opening risky router ports, we will use a Cloudflare Tunnel (Cloudflared).
A. Cloudflare Dashboard Setup
- Log into your Cloudflare account and ensure your custom domain's nameservers are pointing to Cloudflare.
- Go to the Zero Trust Dashboard (usually a link on the left sidebar of the main dashboard).
- Navigate to Networks > Connectors > and click Create a Tunnel.
- Choose Cloudflared as the connector type, give it a name (e.g., tunnel-for-macbookpro), and click Save.
B. Run the Cloudflare Connector on Your Mac
- Cloudflare will show you a page with installation commands.
- Choose Mac and copy the specific command it provides. It will look something like this (using Homebrew):
~% brew install cloudflare/cloudflare/cloudflared
~% cloudflared service install <YOUR_SECRET_TOKEN>
- Run that command in your Terminal. The Zero Trust dashboard page will update at the bottom showing "Status: Connected" once it successfully links up.
C. Route Traffic to Open WebUI
- Click Next in the Cloudflare dashboard to move to the Route tab.
- Under Public Hostname, fill out how you want to access it:
- Subdomain: chat
- Domain: yourdomain.com
- Under Service, map it to your local Docker container:
- Type: HTTP
- URL: localhost:8080 (or 127.0.0.1:8080)
- Click Save Tunnel.
Step 5: Essential Security (Don't Skip!)
- Because your local machine is now exposed to the internet on your domain, you must lock it down so strangers don't hijack your MacBook's hardware.
- Disable Open Signups: In Open WebUI, go to Admin Panel > Settings > Users and turn off Allow New Signups. This ensures you are the only user who can log in.
- (Optional but Highly Recommended) Cloudflare Access: In your Cloudflare Zero Trust Dashboard, go to Access > Applications and create a self-hosted application for chat.yourdomain.com. You can set a policy that requires a one-time PIN sent to your specific email address before anyone can even see your Open WebUI login screen.
To CHECK whether cloudflared is running on Mac
cloudflared tunnel login
cloudflared tunnel list
To REMOVE Cloudflared Tunnel
- Stop and uninstall the service:
sudo cloudflared service uninstall
- Remove the tunnel from Cloudflare
- Login to Cloudflare > Zero Trust > Networks > Connectors > Tunnel > click three dots next the tunnel and DELETE