Synology
Create Cloudflare Tunnel to a Synology NAS
- run cloudflared inside a Docker container via Synology's Container Manager
Step 1: Create the Tunnel in Cloudflare
- Cloudflare Dashboard >Networks > Connectors > Tunnels > Create a tunnel.
- Give your tunnel a descriptive name (e.g., tunnel-to-nas) and click Save tunnel.
- You will see a page showing installation commands for various environments. Look at the code block for Docker.
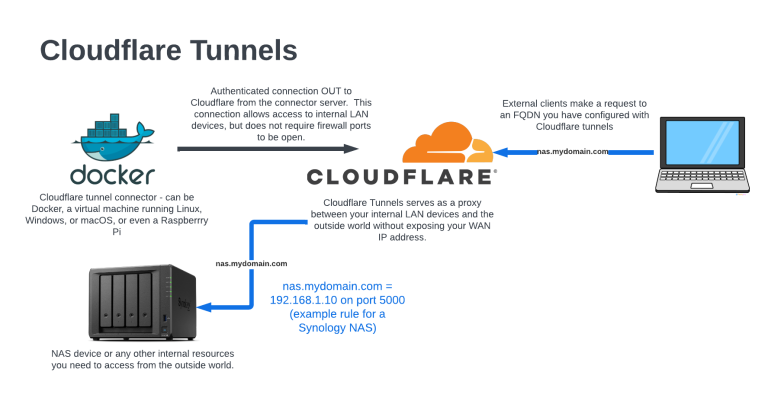
- Important: Do not copy the whole command. Copy only the long alphanumeric string that follows
--token.
Step 2: Deploy cloudflared on Synology
- Synology DSM > Package Center > Container Manager is installed and running
- Open Container Manager, click on Registry in the left panel, and search for cloudflare/cloudflared
- Select the official image (cloudflare/cloudflared), click Download, and choose the latest tag
- Once downloaded, go to the Image tab, select cloudflare/cloudflared:latest, and click Create.
- Configure the general settings:
- Container Name:
cloudflared - Enable Auto-Restart:
Checked(highly recommended so the tunnel reconnects if the NAS reboots). - Click Next to access the Advanced Settings:
- Network:Change this from
bridgetohost. This lets the container talk to your local DSM ports smoothly. - Execution Command:In the Command input box, overwrite anything there and type:
tunnel run --token YOUR_COPIED_TOKEN_HERE
- Cloudflare Tunnel Dashboard. Within a few seconds, the status of your tunnel should change from
InactivetoHealthy.
Step 3: Route Traffic to DSM
- Cloudflare Dashboard > Zero Trust > Networks > Connectors > tunnel-to-nas > Published application routes > Add
- subdomain: nas
- domain: yourdomain.com
- service type: http
- service url: localhost:5000